The purpose of this method is to establish a standard procedure for the proper use of swaging tool for making copper pipe joint.
This method will also serve as guideline for new employees in hvac maintenance department who will be using this tool during routine maintenance activity.
Scope of this standard maintenance method covers all equipment’s which require the use of swaging tool for repair and maintenance of refrigeration and air conditioning equipment’s.
It is the responsibility of the maintenance technician to properly use the swaging tool for making copper pipe joint and to keep the tools in a safe place.
AC Technician should be competent enough to use this tool to avoid any damage and to provide the proper result.
The hvac maintenance supervisor and the maintenance engineer shall ensure the implementation of this procedure during all the preventive maintenance activities.
Brief Description of Swage Joint
Swaging is the process of joining two pieces of copper tubing of the same diameter by expanding or stretching the end of one piece to fit over the other so that joint may be soldered or brazed.
As a general rule, the length of the joint that fits over the other is equal to the approximate outer diameter of the tubing.
You can make a swage joint by using a punch or a lever-type tool to expand the end of the tubing.
Procedure of Swag Copper Pipe Joint
Prior to the start of the pipe jointing work wear necessary PPE i.e. safety shoes, gloves and safety goggles.
Prepare tube cutter, reamer, sand cloth, brush, flaring block, swaging tool and hammer.
Cut the tube to the specified / desired length.
By using the reamer, remove all the burrs and clean all residues from the tubing.
Place the tubing in a flare block or an anvil block that has a hole equal to the size of the outer dia. OD of the tubing.
The tube should extend above the block by an amount equal to the OD of the tube plus approximately 1/8 inch.
Place the correct swaging punch in the tube and strike it with a hammer until the proper shape and length of the joint has been obtained.
A drop or two of refrigerant oil on the swaging tool will help but must be cleaned off before doing the brazing.
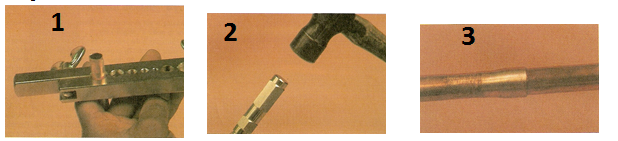
Now assemble the joint. Make sure that the tubes are fitting together easily.
Inspect the tubing after swaging to see if there is crack or other defects. If any are seen or suspected, cut-off the swage and start over.
External References
Refrigeration and Air-conditioning Technology, 3rd Edition By: William C Whitman & William M. Johnson
TESDA Refrigeration and Air-conditioning Manual