The purpose of this document is to establish a standard maintenance procedure for the proper usage of brazing set and to familiarize technician how to conduct brazing using Oxy-Acetylene Brazing Set.
Scope of this standard method covers all equipments which require the use of brazing set for the repair and installation of refrigeration and air-conditioning equipments including the copper pipes/tubes.
It is the responsibility of the maintenance technician to operate and check the condition of the brazing set. He should be competent enough to use this equipment since it is extremely dangerous when not used properly. The supervisor and the site engineer should assure that this maintenance procedure will be followed.
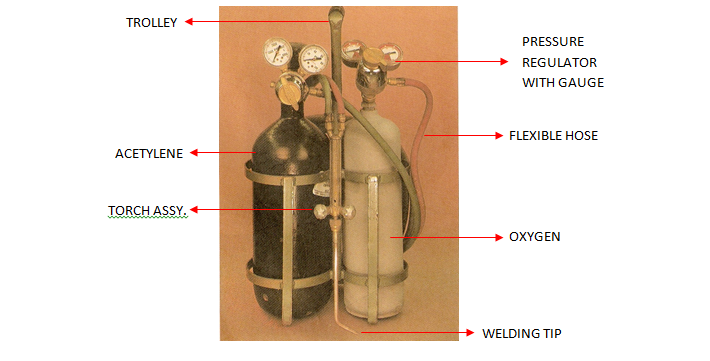
Brief Description of Oxy-acetylene Brazing Set
Oxy-acetylene brazing process uses a high temperature flame. Oxygen is mixed with acetylene gas to produce the high heat.
Brazing equipment includes: oxygen and acetylene cylinders, pressure regulators, hoses, fittings, safety valves, torches and tips.
The regulator has two gauges, one to register tank pressure and the other to register pressure to the torch.
Red hose is attached to the acetylene regulator with left-handed threads and the green hose to the oxygen regulator with right-handed threads.
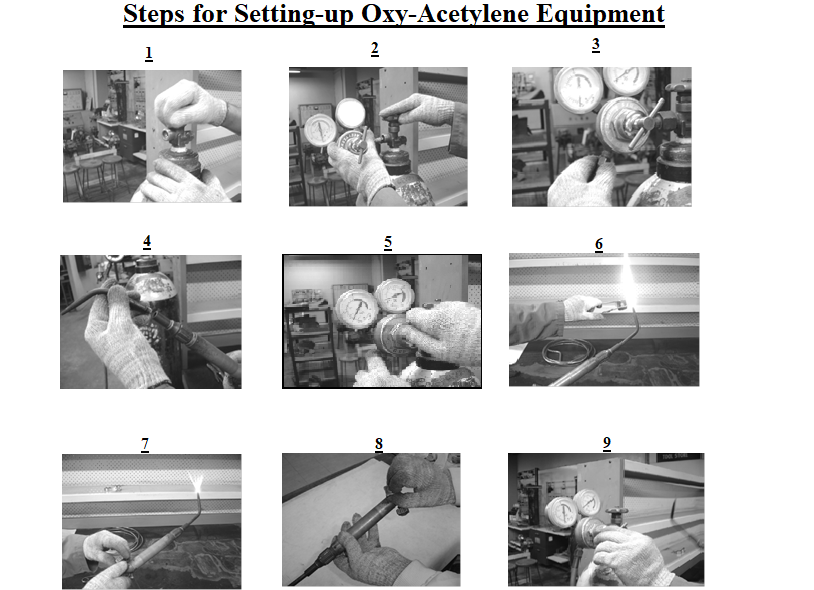
Setting-up Oxy-Acetylene Equipment
Prior to the work, wear safety shoes, safety glasses and gloves. It is advice also to place a Fire Extinguisher near the site during brazing.
Prepare t oxy-acetylene brazing set, adjustable wrench, brazing rod, copper tube, tube cutter, reamer, fittings, sand cloth and brush.
- Crack the cylinder valves to blow any foreign matter which may damage the seats or block the orifice.
- Connect the regulator to the cylinder and tighten the nut securely with a wrench.
- Connect the hose assembly to the regulator and handle.
- Connect the correct size tip to the handle. Use the tank key and leave it on the tank.
- Set-up the adjusting screw for the appropriate pressure.
- Light the flame using flint lighter. Make sure that the pointing tip is not pointing at flammable object or person before igniting.
- Adjust pressure valves to get the desired flame. Characteristics of a Flame:
- Neutral Flame – burns equal amount of oxygen and gas and is Used in welding steel, stainless steel, cast iron, copper and aluminum.
- Oxidizing Flame is achieved by burning excessive amount of oxygen. The center blue cone has a distinct point and achieved by setting a neutral flame then reducing the amount of acetylene. This flame is used when welding brass.
- Carburizing or reducing flame is obtained by opening the acetylene further than required for neutral flame.
- To shut-off the torch, close the oxygen valve in the blowpipe first then the acetylene valve.
- Close the tank valve and open the blow pipe valves to allow the gas to drain out from the hose.
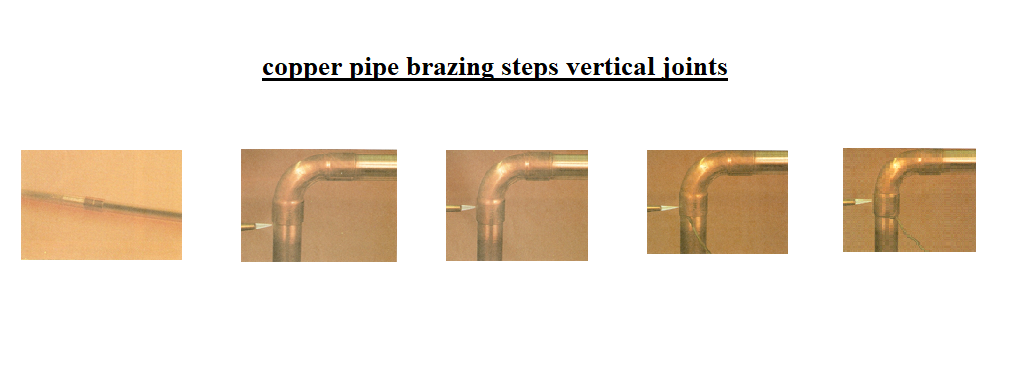
Procedure for Brazing Jointing the Copper Tube / Pipe
Prior to the work, wear safety shoes, safety glasses and gloves. It is advice also to place a Fire Extinguisher near the site during brazing.
Cut desired length of the pipe and remove the burrs using a reamer.
Clean mating parts of the joint. Clean the tube and fitting with sand cloth and then with a brush.
Apply a flux to the male connection.
Assemble the tubing and fitting and place it in a support to avoid moving while brazing.
Start heating the tube near the fitting for a short time.
Move the torch from the tubing to the fitting.
Keep moving the torch to spread the heat evenly and do not overheat any area.
Hold the torch so that the inner cone of the flame just touches the metal.
After briefly heating the joint, touch the brazing rod to the joint.
(Do not melt the rod with the flame, the rod should melt and flow freely from the heat of the metal.
Feed enough brazing rod to fill the joint.
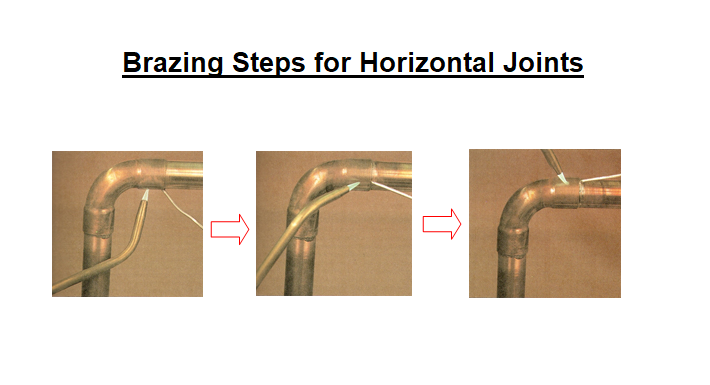
For horizontal joints, it is preferable to apply the filler metal first at the bottom, then to the sides and finally to the top, making sure the operations overlap.
When the joint is at the correct temperature, it will be cherry red in color.
While the joint is still hot, you may wipe it with a rag to remove excess solder. This would improve the appearance of the joint.
External References
Refrigeration and Air-conditioning Technology, 3rd Edition By: William C Whitman & William M. Johnson
TESDA Refrigeration and Air-conditioning Manual