This installation method statement is a brief outline of quality requirements for refrigerant piping system. It contains a work methodology and procedure, which is applicable with the specific work. The method also provides appropriate reference to all procurement, fabrication and construction activities and identifies quality related matters.
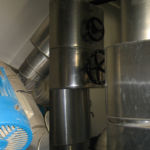
All materials shall be carefully off-loaded at site using necessary manpower in such a way that no damage is caused to copper pipes and fittings. Material will be inspected at offloading point for any physical damage and completeness, MIR shall be submitted to consultant for verification / approval.
Below is list of necessary tools and equipment’s for the installation works.
- Drill
- Hilti
- Hand
- Brazing
- Spirit
- Flaring
- Tube
- Vacuum pump.
- Cutting
- Tube
Sequence of Work for Refrigerant Piping Installation
The installation works will be carried out strictly in accordance with this documents / specifications / approved material submittal.
Arrange all the materials i.e. copper pipes, copper fitting, clamp support, threaded rod, nut/Bolt, Oxy-Acetylene cylinder with complete set, brazing rod and copper pipe insulation.
Install piping as short and direct as possible, with a minimum number of joints, elbows and fittings as recommended by equipment supplier piping layout.
Pipe shall be cut accurately to measurements established at the construction site and shall be worked into place without springing or forcing.
Install piping with adequate clearance between pipe and adjacent walls and hangers or between pipes for insulation installation. Use sleeves through floors, walls, or ceilings, sized to permit installation of full thickness insulation.
Installation must be as rapid as possible so that significant quantities of moisture, air or other impurities have little chance of collecting in the system.
Pipe shall be provided with capping or plugged ends when shipped and as erected, to prevent contaminating the system.
Pipe must be cut with a tube cutter, reamed and burrs removed.
Both inside of fittings and outside of tubing shall be well cleaned with an abrasive cloth or stainless steel wire brush before brazing.
All brazed joints shall be cleaned to remove residual flux.
Remove internal and external burrs with a de-burring tool, as applicable.
Brazing Copper Tube Jointing Procedure
The tube will be cut to desired length with a square cut, preferably in a square-end sawing vise.
Cutting wheel of the type specifically designed for cutting copper tube will also be used to do a satisfactory job.
Tube will be the exact length needed, so that the tube will enter the cup of the fitting all the way to the shoulder of the cup.
Remove all slivers and burrs left from cutting the tube, by reaming and filing, both inside and outside.
To make a proper brazing joint, the clearance between the solder cup and the tube will be approximately 0.001″ to 0.010″ (0.0254mm to 0.254mm).
Maintaining a good fit on parts to be brazed ensures:
Ease of Application: excessively wide tolerances tend to break capillary force; and, as a result the alloy will either fail to flow throughout the joint or may flush out of the joint.
Corrosion Resistance: there is also a direct relation between the corrosion resistance of a joint and the clearance between members.
The surfaces to be joined will be clean and free from oil, grease and heavy oxides.
End of the tube need be cleaned only for a distance slightly more than it is to enter the cup.
Special wire brushes designed to clean tube ends may be used, but they should be carefully used so that an excessive amount of metal will not be removed from the tube.
Fine sand cloth or emery cloth will also be used with the same precautions.
The cup of the fitting will be cleaned by methods similar to those used for the tube end, and care should be observed in removing residues of the cleaning medium.
Brazing alloys will not flow over or bond to oxides; and oily or greasy surfaces tend to repel fluxes, leaving bare spots which will oxidize, resulting in voids and inclusions. So make sure above mentioned deficiencies will be overcome by good workmanship.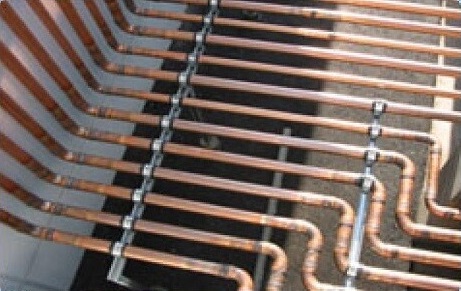
Flux will be applied to the tube and solder cup sparingly and in a fairly thin consistency. Avoid flux on areas not cleaned. Particularly avoid getting excess flux into the inside of the tube itself.
Immediately after fluxing, the parts to be brazed will be assembled. If fluxed parts are allowed to stand, the water in the flux will evaporate, and dried flux is liable to flake off, exposing the metal surfaces to oxidation from the heat. Assemble the joint by inserting the tube into the cup, hard against the stop. The assembly will be firmly supported so that it will remain in alignment during the brazing operation.
Heating using the Oxy-Acetylene Set
Brazing will be started by applying heat to the parts to be joined.
The preferred method is by the oxyacetylene flame. A slightly reducing flame will be used, with a slight feather on the inner blue cone; the outer portion of the flame, pale green.
Heat the tube first, beginning at about one inch from the edge of the fitting.
Sweep the flames around the tube in short strokes up and down at right angles to the run of the tube.
It is very important that the flame be in continuous motion and will not be allowed to remain on any one point to avoid burning through the tube.
Generally, the flux may be used as a guide as to how long to heat the tube, continuing heating after the flux starts to bubble or work, and until the flux becomes quiet and transparent, like clear water. The flux will pass through four stages:
A. At 212°F (100°C) the water boils of.
B. At 600°F (315.6°C) the flux becomes white and slightly puffy and starts to work.
C. At 800°F (426.7°C) it lays against the surface and has a milky appearance.
D. At 1100°F (593.3°C) it is completely clear and active and has the appearance of water.
Now switch the flame to the fitting at the base of the cup. Heat uniformly, sweeping the flame from the fitting to the tube until the flux on the fitting becomes quiet. Avoid excessive heating of cast fittings.
When the flux appears liquid and transparent on both the tube and the fitting, start sweeping the flame back and forth along the axis of the joint to maintain heat on the parts to be joined, especially toward the base of the cup of the fitting.
The flame will be kept moving to avoid burning the tube or the fitting.
Apply the brazing wire or rod at a point where the tube enters the socket of the fitting.
The temperature of the joint should be hot enough to melt the brazing alloy. Keep the flame away from the rod or wire as it is fed into the joint.
Keep both the fitting and the tube heated by moving the flame back and forth from one to the other as the alloy is drawn into the joint.
When the proper temperature is reached, the alloy will flow readily into the space between the tube outer wall and the fitting socket, drawn in by the natural force of capillary attraction. When the joint is filled, a continuous fillet of brazing alloy will be visible completely around the joint. Stop feeding as soon as the joint is filled.
All piping shall be rigidly supported from the building structure from the building structure by means of rubber lined supports. Unistrut hangers shall be used where pipes run side by side. Hanger spacing shall be follows:
Horizontal Supports:
Copper piping Maximum spacing
3/8” and under 4’
½” through ¾” 6’
2” and larger 10’
Vertical: Copper piping sh
all be supported at 10 feet intervals maximum.
Pipe fixing brackets, Clips, etc. must be pitched to suit the pipe diameter and load from components mounted in the line.
Leak Testing of Refrigerant Piping System
The testing media shall be dry nitrogen. Perform the leak test before insulation, evacuating and charging.
Isolate the compressor from the leak test by firmly closing the suction and discharge valves.
Do not attempt to repair any leak while the system is pressurized. If any leak are found, relieve the rest pressure and perform repairs.
The entire refrigerant system, including all control system shall be tested and balanced before operation.
All installation work will be undertaken in accordance with project safety requirements.
Site personnel shall be provided with the necessary personal protective measures such as head gear, safety boots, safety belts & goggles and shall be worn on site.
All site work activities will be kept in a clean and tidy condition.
After completion of refrigerant piping installation works, the area involved will be clear and cleaned from excessive materials and debris etc.