The purpose of this AC repair method is to establish a standard procedure for identifying gas leaks on air conditioning and refrigeration system thus preventing release of refrigerant gas in the atmosphere.
This method will also serve as guideline for new and old employees for performing the ac maintenance activity.
The scope of this standard covers all maintenance activities for A/C and refrigeration equipments.
It is the responsibility of the A/C technician to conduct refrigerant leakage testing on the AC and refrigeration system by using standing pressure test and by using bubble test.
Technician shall be competent enough to use the ac gas leakage testing equipment to avoid any damage and to provide the proper result.
Maintenance supervisor and the engineer shall make sure the implementation of this maintenance procedure during routine air-conditioning repair and maintenance works.
Brief Description of Refrigerant Leakage Detection
The best leak checking procedure is the standing pressure test using a pressure source that will not change any appreciable amount with temperature changes.
Nitrogen is a good gas to use for the leakage detection of refrigerant gases.
If the system is pressurized but has less gas, it is recommended also to use the bubble test wherein diluted soap and water is applied to every joints and if bubble is made, gas leak is present on the joints.
Procedure for Refrigerant Leakage Test
Prior to the start of maintenance work, wear safety shoes, goggles, gloves and any other PPE as per project requirements.
Prepare adjustable wrench, nitrogen cylinder, gauge manifold, liquid soap and water.
Follow this procedure when replacing old compressor or when you feel or doubt that system pressure is less with refrigerant gas.
Refer below diagram for guidelines on system set up and making the nitrogen cylinder connections.
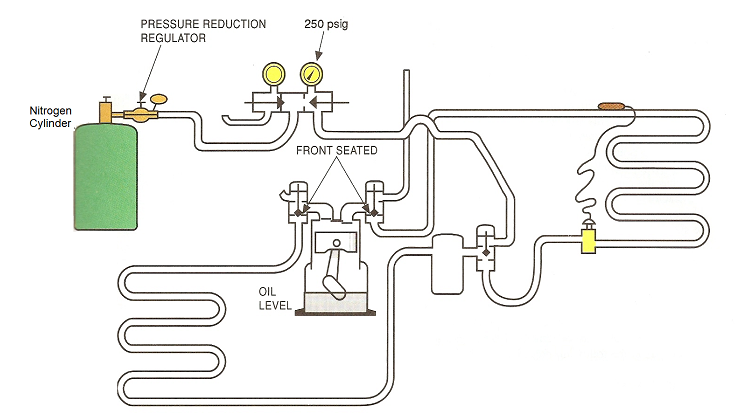
Install the nitrogen cylinder hose to the middle portion of the gauge manifold.
Now close the LP side of the gauge manifold.
Isolate the compressor by front seating the suction and the discharge valve of the compressor.
Open the Pressure Reduction Regulator of the Nitrogen Tank.
Open the valve of the HP side of the gauge manifold.
Charge the system with dry nitrogen until pressure reaches 150 psig or as per the equipment maximum rated pressure.
Do not pressurize any system above its working pressure as written on the label of the equipment.
Let the system stand for a while and check the pressure gauge, if the reading falls, there is a leak.
Using diluted water and soap, apply solution to every connecting joint. If bubbles occur, double check visually from where the leakage gas is coming out.
You can also check by visual inspection any leak in the system if traces of oil are present. After confirming presence of oil, conduct bubble test to confirm where exactly the leak is coming from.
Now you can decide about the repair of the joint for smooth operation of the air conditioning system.
References
- Refrigeration and Air-conditioning Technology, 3rd Edition By: William C Whitman & William M. Johnson
- TESDA Refrigeration and Air-conditioning Manual